Various Usage Scenarios
Input Type
By default, the settings make it easy to differentiate between various types of clicks. However, if you only need to left-click (tap), changing the input type to auto-click or using the always-on cursor sync mode may improve usability.
| Mode/Input Type | Cursor Movement Trigger | Click | Operation Speed | Ease of Operation | Overall Assessment |
|---|---|---|---|---|---|
| ASSIST (Normal Mode, Click Selection) | Nod | Left/Right/Double/D&D | ★★★ | ★★★ | A balanced configuration allowing all operations with few steps. |
| ASSIST (Normal Mode, Auto-Click) | Nod | Left only | ★★★★ | ★★★★ | The easiest configuration if you only perform left-clicks. |
| ASSIST (Normal Mode, Judge Each Time) | Nod (Down→Up) / Reverse Nod | Left/Right/Double/D&D / Left only | ★★★★★ | ★★ | Operation is complex, but it's the fastest configuration possible. |
| ASSIST (Always-on Sync Mode, Auto-Click) | None | Left only | ★★★★ | ★★★★ | Easy to understand, but be aware that even a slight head movement can trigger a click. |
| [Reference] ASSIST (Always-on Sync Mode) + Click with a regular mouse | None | Depends on the mouse | ー | ー | This type of configuration is also possible. |
Utilizing the On-Screen Keyboard
The normal mode of JINS ASSIST is designed with the goal of efficiently differentiating between left, right, and double clicks using only head movements. When using an on-screen (accessibility) keyboard, it's possible to operate at a reasonable speed with the default settings. However, by combining JINS ASSIST's always-on sync mode with the OS feature that automatically clicks upon stopping, you can achieve even faster text input.
HINT
By assigning Mode Switch to a quick shortcut in JINS ASSIST, such as one leftward back-and-forth or one rightward back-and-forth, you can switch between normal mode and always-on sync mode more quickly.
LIMITATION
Please note that due to OS limitations, the selection assist pop-up in normal mode will not appear in front of the on-screen keyboard (though the click will be registered).
On-Screen Keyboard Windows
Windows On-Screen Keyboard
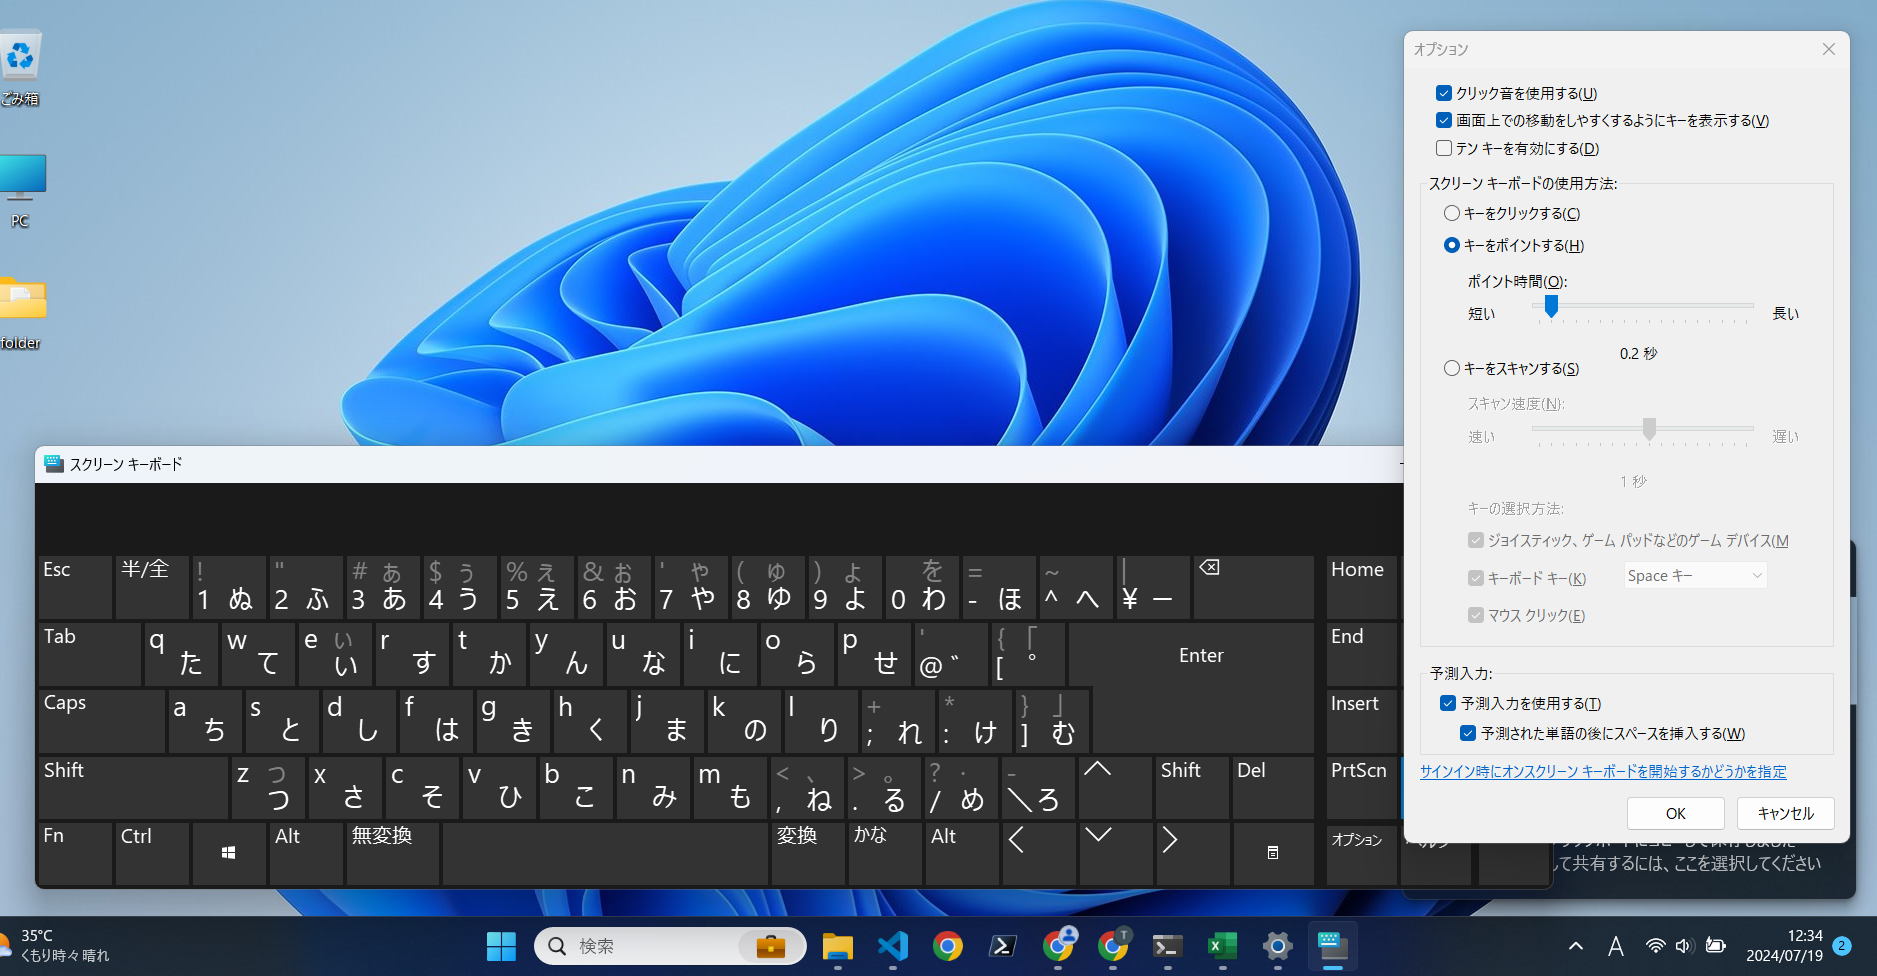
Settings
- Type On-Screen Keyboard in the search bar to launch the app, or go to Start > Settings > Accessibility > Keyboard and turn on the On-Screen Keyboard toggle.
- There is a similar feature called Touch Keyboard, but it does not support the auto-click on hover function.
- Click Options from the key list and tap Hover over keys under "How to use the On-Screen Keyboard".
- Change the Hover duration to a comfortable number of seconds.
Input Method
- Switch JINS ASSIST to always-on sync mode.
- After moving the cursor to where you want to input text, hover the cursor over a key on the on-screen keyboard and hold it still to input that key.
- To switch between Japanese and English, click the Han/Zen key on the on-screen keyboard or click the input indicator ([A] or [あ]) on the taskbar.
- To switch to Kana input instead of Romaji input, right-click the input indicator on the taskbar and click Kana input.
Accessibility Keyboard Mac
Mac Accessibility Keyboard
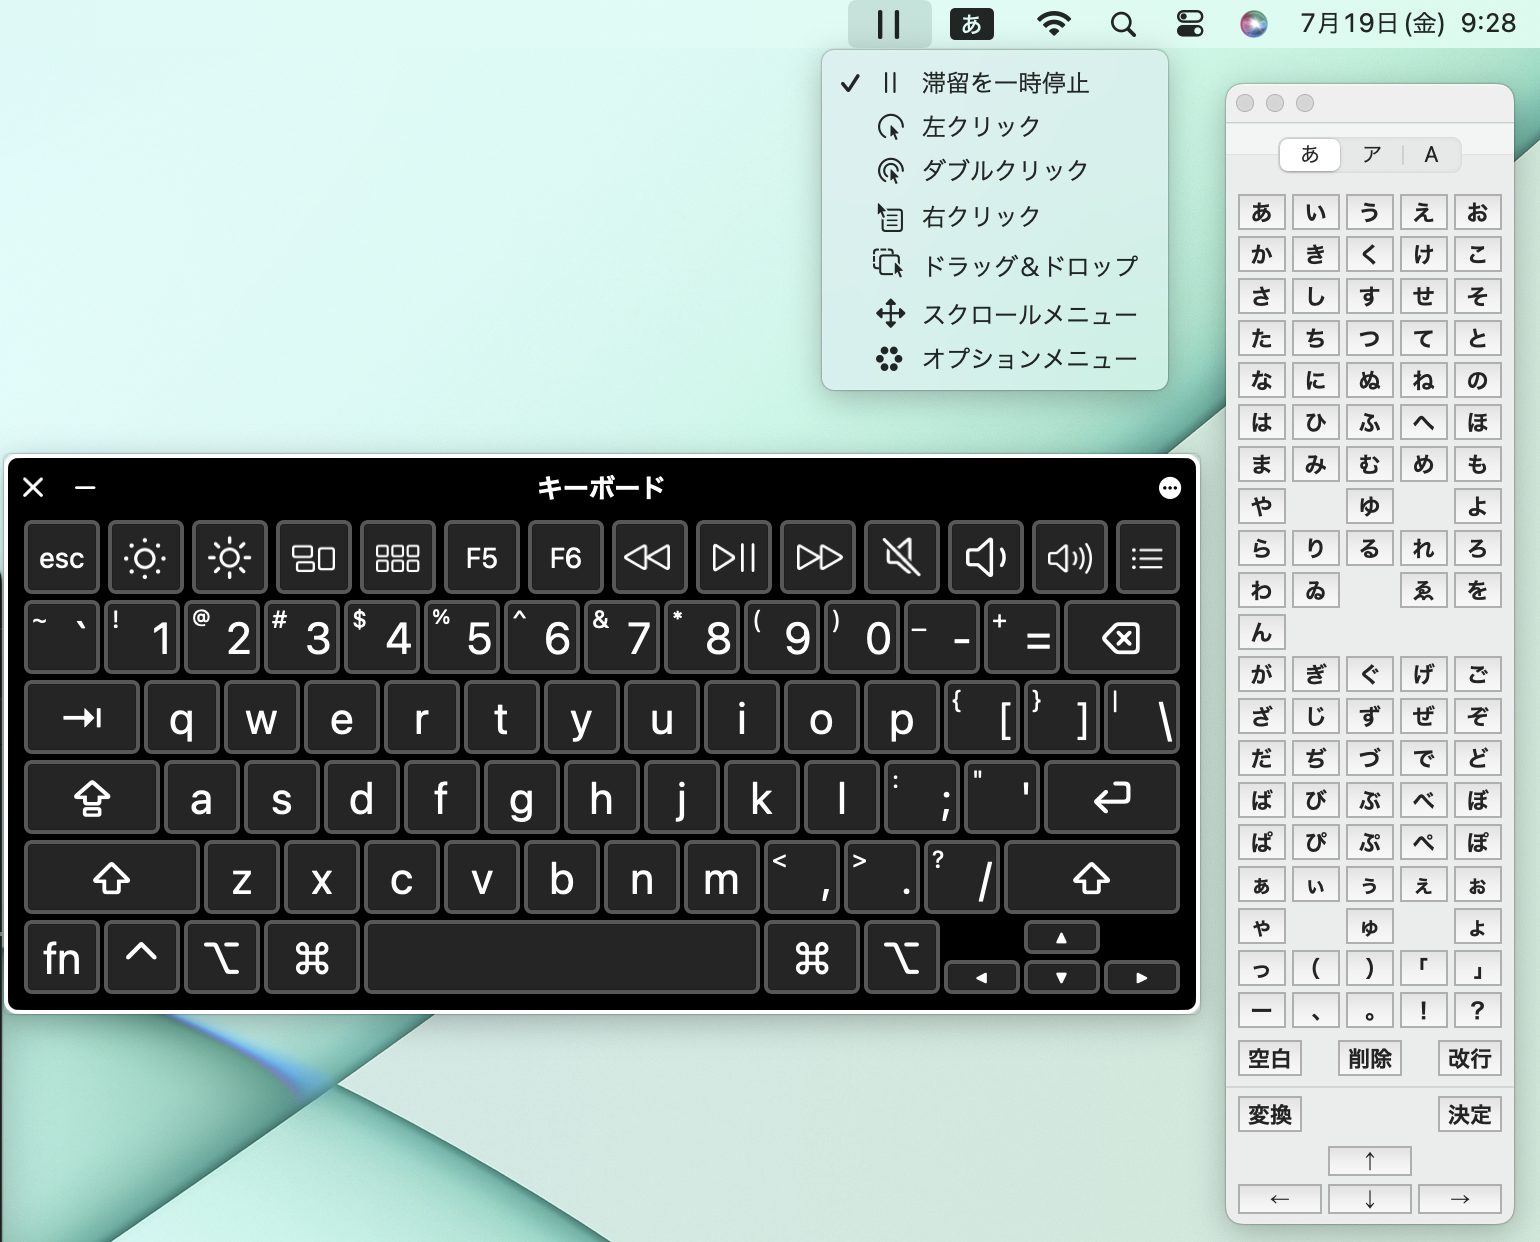
Settings
- Choose Apple menu > System Settings, click Accessibility in the sidebar, click Keyboard on the right, then turn on Accessibility Keyboard.
- Set the default dwell action to Left Click.
- This setting can also be changed from the menu bar while the Accessibility Keyboard is displayed.
- Change the default dwell time to a comfortable number of seconds.
Input Method
- Switch JINS ASSIST to always-on sync mode.
- After moving the cursor to where you want to input text, hover the cursor over a key on the Accessibility Keyboard and hold it still to input that key.
- To switch between Japanese and English, press Cmd+Shift or click the input indicator ([A] or [あ]) in the menu bar and switch between ABC <-> Japanese.
- To switch to Kana input instead of Romaji input, show the Kana Palette from the input settings in the menu bar and input from there.
- In the Kana Palette, you can input hiragana, katakana, and alphanumeric characters by switching character types, but you cannot input Cmd/Option/Ctrl. Please use the Accessibility Keyboard in conjunction.
Utilizing Voice Input Features
Modern operating systems are equipped with relatively high-precision text and command input functions. By using these features in combination with JINS ASSIST, you can efficiently perform PC tasks hands-free.
Voice typing on Windows 11
Starting and Stopping Voice Typing
| Action | How to do it |
|---|---|
| Start voice typing | - Tap the microphone button on the touch keyboard - Windows logo key + H (shortcut setting recommended) |
| Stop voice typing | - Press the microphone button on the voice typing menu - Windows logo key + H (shortcut setting recommended) - Say a voice command to stop or pause voice typing, as listed below |
Voice Commands
You can perform input operations with the following commands while voice typing is active.
| Action | Say |
|---|---|
| Stop or pause voice typing | - Pause voice typing - Pause dictation - Stop voice typing - Stop dictation - Stop listening - Stop dictation - Stop voice mode - Pause voice mode |
| Delete the last spoken word or phrase | - Delete that - Erase that - Undo that |
| Select the last spoken word or phrase | - Select that |
Punctuation and Symbol Commands
You can input punctuation and symbols with the following commands while voice typing is active.
| Punctuation/Symbol | Say |
|---|---|
| - | Minus sign, hyphen |
| ! | Exclamation point, exclamation mark |
| # | Number sign, pound sign |
| $ | Dollar sign |
| % | Percent sign |
| & | And sign, ampersand |
| ( | Open parenthesis, left parenthesis |
| ) | Close parenthesis, right parenthesis |
| * | Asterisk |
| , | Comma |
| ... | Ellipsis |
| . | Period |
| ; | Semicolon |
| ? | Question mark |
| @ | At sign, at symbol |
| [ | Open bracket, left bracket |
| \n | New line, new paragraph, enter |
| ] | Close bracket, right bracket |
| £ | Pound sign |
| ¥ | Yen sign |
| 「 | Open quote |
| 」 | Close quote |
| 『 | Open double quote |
| 』 | Close double quote |
| € | Euro sign |
| + | Plus sign |
| < | Less-than sign |
| = | Equals sign |
| > | Greater-than sign |
| ± | Plus-minus sign |
| ° | Degree sign |
Dictation on macOS
https://support.apple.com/en-us/guide/mac-help/mh40695/15.0/mac/15.0
Initial Setup
- On your Mac, choose Apple menu > System Settings, then click Keyboard in the sidebar.
- Go to "Dictation," then turn it on/off.
Starting and Stopping Dictation
| Action | How to do it |
|---|---|
| Start dictation | - Press the Microphone key on your Mac (if available in the row of function keys) - Press the keyboard shortcut for dictation (default is pressing the Control key twice, setting a shortcut is recommended) |
| Stop dictation | - Perform the same action as starting it |
Formatting
| Format | Say |
|---|---|
| Start a new line | New line |
| Format the next phrase as a number | Numeral |
| Format the next phrase as a Roman numeral | Roman numeral |
| Start a new paragraph | New paragraph |
| Format the next phrase with no space | No space on |
| Resume default spacing | No space off |
| Move the cursor to the next tab stop | Tab key |
| Format the next phrase with "Title Case" | Caps on |
| Resume default capitalization | Caps off |
| Format the next word in "All Caps" | All caps |
| Format the next phrase in "All Caps" | All caps on |
| Resume default capitalization | All caps off |
Punctuation and Symbol Commands
| Punctuation/Symbol | Say |
|---|---|
| ‘ | Apostrophe |
| [ | Open bracket |
| ] | Close bracket |
| ( | Open parenthesis |
| ) | Close parenthesis |
| { | Open brace |
| } | Close brace |
| < | Open angle bracket |
| > | Close angle bracket |
| : | Colon |
| , | Comma |
| – | Dash |
| … | Ellipsis |
| ! | Exclamation mark |
| - | Hyphen |
| . | Period/point/dot/full stop |
| ? | Question mark |
| “ | Open quote |
| ” | Close quote |
| ‘ | Open single quote |
| ’ | Close single quote |
| ; | Semicolon |
| & | Ampersand |
| * | Asterisk |
| @ | At sign |
| \ | Backslash |
| / | Forward slash |
| ^ | Caret |
| · | Middle dot |
| ● | Large middle dot |
| ° | Degree symbol |
| # | Hashtag/pound sign |
| % | Percent sign |
| _ | Underscore |
| | | Vertical bar |
| = | Equals sign |
| > | Greater-than sign |
| < | Less-than sign |
| - | Minus sign |
| x | Multiplication sign |
| + | Plus sign |
| $ | Dollar sign |
| ¢ | Cent sign |
| £ | Pound sign |
| € | Euro sign |
| ¥ | Yen sign |
| © | Copyright sign |
| ® | Registered trademark sign |
| ™ | Trademark sign |
Emoji
| Type | Say |
|---|---|
| :-) | Smiley face |
| :-( | Frowny face |
| ;-) | Winky face |
| XD | Laughing out loud |
Dictation on ChromeOS
Initial Setup
- At the bottom right, select the time. Or press Alt + Shift + s.
- Select Settings → Accessibility.
- Under "Keyboard and text input," turn on Dictation.
Starting and Stopping Dictation
| Action | How to do it |
|---|---|
| Start dictation | - Select Speak 🎙 - Search + d - Launcher + d |
| Stop dictation | - Perform the same action as starting it |
Shortcut Key Execution Setting Examples
Here are some examples of inputting shortcuts that involve pressing keys simultaneously.
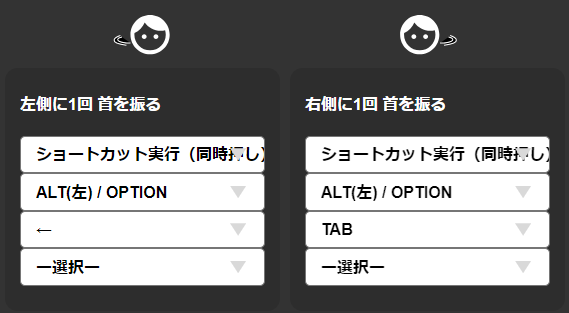
Setting example on Windows
- Example 1: Go back a page in Windows Chrome browser... Assign Alt + ← operation to one leftward back-and-forth motion.
- Example 2: Switch active windows on Windows... Assign Alt + Tab operation to one rightward back-and-forth motion.
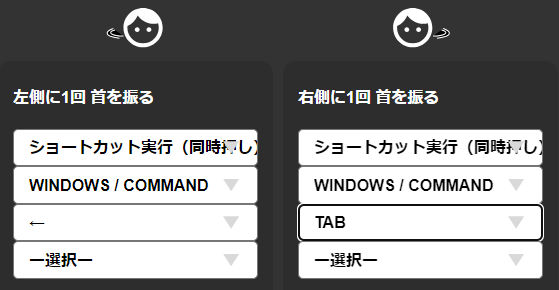
Setting example on macOS
- Example 3: Go back a page in Mac Chrome browser... Assign Cmd + ← operation to one leftward back-and-forth motion.
- Example 4: Switch active windows on Mac... Assign Cmd + Tab operation to one rightward back-and-forth motion.
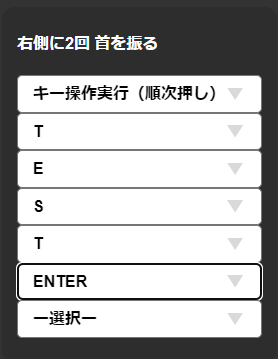
Sequential Key Operation Setting Examples
You can assign operations that input keys sequentially, such as typing a fixed phrase. ※Do not use this for inputting confidential information such as passwords.
Text input setting example
- Example: Input "test" followed by the Enter key... Performing two rightward back-and-forth motions will input "test" (Enter key).
Settings and Operations Specific to Mobile OS
Mobile operating systems heavily utilize touch and swipe gestures, so settings need to be configured for comfortable use with a mouse.
iOS (AssistiveTouch) Settings
iOS (AssistiveTouch) Settings
On iOS 14 and later, you can enable AssistiveTouch with the following steps. Enabling AssistiveTouch allows you to call gesture functions, which are difficult to perform with a mouse, via tap operations.
- Connect JINS ASSIST (If connecting to a device older than iPhone 15, please use a Lightning to USB-C adapter).
- Open "Settings" from the home screen.
- Tap "Accessibility".
- Tap "Touch".
- Turn on "AssistiveTouch".
Doing this will cause a gray circle to appear on the screen. Tapping this circle allows you to quickly call up gesture functions like the following. These can be further customized in the AssistiveTouch settings.
- Home
- Siri
- Control Center
- Notification Center
- Notifications
- Device (volume button operations, etc.)
Android Settings
Android Settings
Android 10 and later introduced Gesture navigation, a feature for displaying the HOME screen and switching apps, but it's based on swiping, making it difficult to use with JINS ASSIST. Therefore, we recommend using the traditional 3-button navigation when using it on Android. To switch from Gesture navigation to 3-button navigation, please change it from the Navigation mode in the Settings app.
- Open the "Settings app".
- Tap "System".
- Tap "Navigation mode".
- Turn on "3-button navigation".
※The location varies by device, so in that case, please search for Navigation mode from the settings search.
Settings when using Gesture navigation
By default, the long-press detection reacts before the drag, so change Settings → Accessibility → Timing controls → Touch & hold delay to Long. The operations will be as follows:
- Horizontal movement on the Home screen: Scroll left or right.
- List of running apps: Drag up from the bottom edge of the screen.
- Bring up the Notification Center: Drag down from the top edge of the screen.
- Open the app drawer: Drag up from the bottom edge of the screen.
Useful Settings for Gaming
The following settings are effective for game operations.
Link head movement and viewpoint in always-on sync mode
In addition to your existing devices, using this as an auxiliary device to link head movement and viewpoint allows you to play with a sense of actually looking in that direction. ※Please note that while it syncs with movement, it does not perfectly match the direction your face is pointing.
Intuitively move the viewpoint without cursor acceleration
Disabling acceleration allows the cursor (viewpoint) to move intuitively in proportion to speed. However, your head's forward direction and the player's forward direction will gradually shift, requiring correction with a shortcut command or another mouse.

Freely move the viewpoint with cursor acceleration
Enabling acceleration allows you to move the cursor more than the speed when you move your head faster. It's less intuitive than without acceleration, but you can complete the forward direction correction with head movements.

Change direction with a shortcut
By setting a shortcut that moves the cursor a certain direction and amount in a one-way motion, you can move the cursor (viewpoint) a fixed amount.

Briefly look sideways with a shortcut
By setting a shortcut that moves the cursor a certain direction and amount in a round-trip motion, you can briefly move the cursor (viewpoint) sideways and back. The interval before returning can be selected.

Use only shortcuts
If you want to use only shortcuts without cursor movement, please set (1) Operation Mode to Always-on Cursor Sync, and (2) Cursor On/Off to Off.
Game Setting Samples
Link viewpoint in a sandbox game
- In addition to linking the viewpoint, adding a command to look directly behind you can serve as a countermeasure against mobs that sneak up from behind and suddenly explode.
Recommended Settings
| Setting Item | Setting Content | Effect of Setting |
|---|---|---|
| Operation Mode | Always-on Sync Mode | Links head movement and viewpoint. |
| Cursor Acceleration Speed | None (far left) | Moves the viewpoint in proportion to head movement. |
| Cursor Movement Speed | 2-3 from the left | Makes the viewpoint movement slower. |
| Left 1 back-and-forth shortcut | Cursor Move One-Way Left Distance:130 Divisions:10 | Turns about 45 degrees left with a left 1 back-and-forth shortcut. |
| Right 1 back-and-forth shortcut | Cursor Move One-Way Right Distance:130 Divisions:10 | Turns about 45 degrees right with a right 1 back-and-forth shortcut. |
| Command Sensitivity | Insensitive (1-3 from left) | Does not react to fast head movements, prevents wobbling, and allows for direction adjustment with slow head movements. |
Note *1 When operating on a smartphone/tablet, touch and mouse conflict (mouse operations are not accepted during touch operations). No conflict occurs with keyboard operations.
Use shortcuts to check mirrors and behind in a driving simulator
Calling up mirror checks and rear checks with shortcuts makes right/left turns and reversing easier. This kind of setting is also effective in FPS games where you want to look sideways or behind quickly and accurately.
| Setting Item | Setting Content | Effect of Setting |
|---|---|---|
| Operation Mode | Always-on Sync Mode | Turns off command operations by setting to always-on sync mode. |
| Cursor On/Off | Off | Uses only shortcuts. |
| Left 1 back-and-forth shortcut | Cursor Move Round-Trip (0.5s wait) Left Distance:500 Divisions:1 | Allows you to check the left mirror with a left 1 back-and-forth shortcut. |
| Right 1 back-and-forth shortcut | Cursor Move Round-Trip (0.5s wait) Right Distance:800 Divisions:1 | Allows you to check the right mirror with a right 1 back-and-forth shortcut. |
| Left 2 back-and-forth shortcut | Cursor Move Round-Trip (1s wait) Left Distance:1600 Divisions:1 | Allows you to check directly behind from the left window with a left 2 back-and-forth shortcut. |
| Right 2 back-and-forth shortcut | Key Operation key 0 | Calls the view reset, which is set to Key 0 on the ETS2 side. |